I was due for a fresh set of gel polish this week, and have been craving black and white lately. I don't usually gravitate towards dark nail colors, because I feel like they make my nails look small and (sometimes) weird. #truenailconfessions. BUT, I've been seeing black and white nails all over my feed lately, and it had me wanting it on my own fingers.
Since I try to ride out these gel polish sets as long as possible, I can't slack on the nail art for my right hand. I figured constellations would be easy enough that I could pull off something passable using my left hand.
I started with two coats of my new favorite black gel polish, Presto #060 Minaccioso. Next, I used Wildflower's Art Paints in Powder to paint on constellations and stars. Then, I used two coats of gel topcoat to seal the paint details in. Easy peasy!
P.S. They're all based on real constellations! I wanted to do my zodiac sign, but who knew Sagittarius had so many stars in it?!?!?
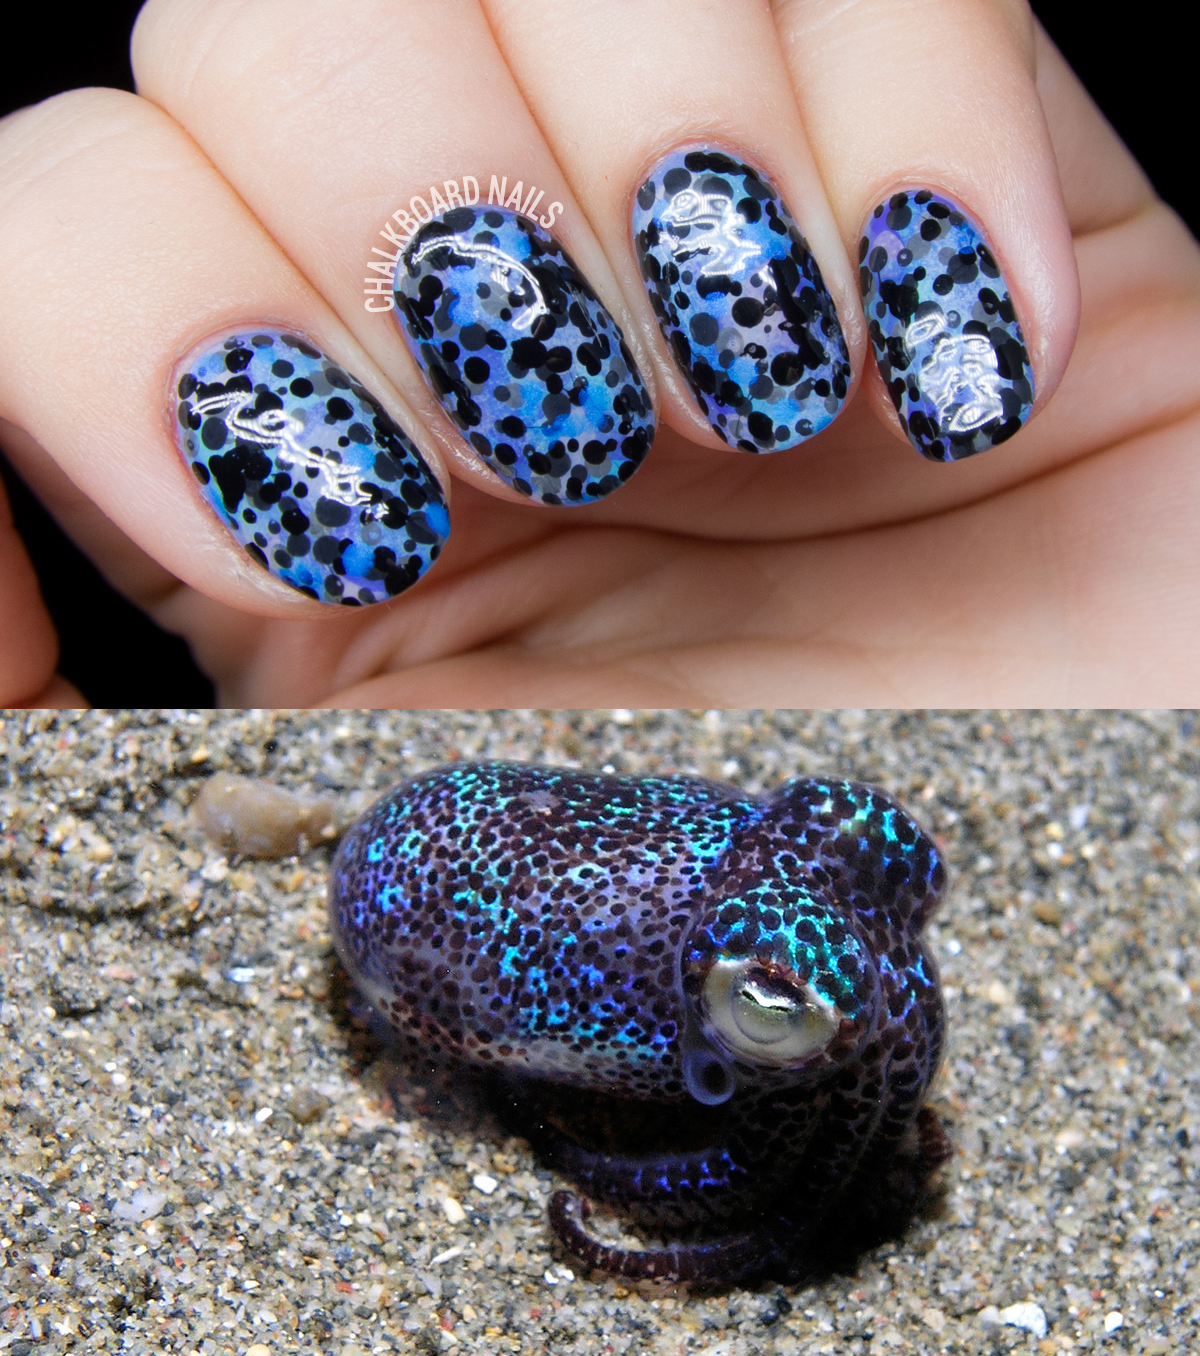
It's animal print day in the challenge and I'm continuing my tradition of choosing an unusual animal! Last year I did a goldfish pattern, and the year before that was a manta ray, so I'm also sticking with the underwater theme in my choice. It's a bobtail squid! I've actually been saving this picture forever to try to recreate it, and it was more an exercise in color matching than actual nail art.
Since we're talking about color matching, here are the polishes that I used: China Glaze Secret Periwinkle China Glaze Raindance the Night Away Girly Bits I've Got High Hoops Orly Skinny Dip LVX Legendaire Salon Perfect Oil Slick (and variations mixed with white)
So I don't think I did too terribly in terms of getting the colors right, though one thing I'm a little short on is iridescence. One of my blues had a bit of shimmer in it, so that helped, but if I were to try this again I would definitely incorporate nail art foil. I may have to attempt that soon!
It's "polka dot" day in the 31 Day Challenge and I'm pushing the boundaries of the prompt a bit! That is, I used polka dots to create a major part of the design!
The Mickey Mouse head is such a major part of pop culture that pairing it with a trippy, psychedelic background creates a really unique combination. I'd say it's almost kind of unsettling if I didn't find it so cute and fun!
I put down a light base to begin (I'm actually wearing gels underneath this regular polish look!).
Then, I painted on the tie-dye look using five shades. I used the same method I did in this Rodarte-inspired tie dye tutorial from 2013!
The final step was to add the Mickey heads with Salon Perfect Oil Slick! I used a rhinestone picker for the larger dots and a dotting tool for the ears. If you don't have anything you could use for the bigger dots, you could use a pencil eraser.
It’s “violet” day in the 31 Day Challenge! I decided to do nail art inspired by some gorgeous orchids that I spotted in our local grocery store. The pattern on the petals was so compelling that I just had to snap a pic of them to use for future nail art.
This was maybe the easiest nail art in the world, and I love how it turned out. I started with a cream colored base, and then used a large dotter to add the magenta patterning. I grabbed a smaller dotter and added purple to the pattern, inside of the larger dots. Then all that was left was to finish with topcoat!
This tutorial post is sponsored by Macmillan. Today's nail art tutorial is inspired by B.T. Gottfred's novel, Forever For a Year. Since the book is all about romance and first love, I've created a look that's perfect for date night. This sultry bordeaux gradient is accented with a gold jewelry-style half moon. It's a look that is chic, romantic, and put together... with just a touch of flash.
Forever For a Year has also provided a date night prize pack for a giveaway! Head to the end of the post for details on how to enter.
For my date night nail art, I used: LVX Cameo (burgundy) OPI Lincoln Park After Dark (dark purple) Essie Good As Gold (gold)
You'll also need a cosmetic sponge, cotton swabs or a latex barrier, and dotting tools in three sizes (large, small, and pinpoint).
With this easy gradient nail art, you'll be date-night ready in no time! And no matter where the night takes you, you know your tips will be looking fresh.
About Forever For a Year When Carolina and Trevor meet on their first day of school, something draws them to each other. They gradually share first kisses, first touches, first sexual experiences. When they're together, nothing else matters. But one of them will make a choice, and the other a mistake, that will break what they thought was unbreakable. Both will wish that they could fall in love again for the first time . . . but first love, by definition, can't happen twice.
Told in Carolina and Trevor's alternating voices, this is an up-close-and-personal story of two teenagers falling in love for the first time, and discovering it might not last forever. In stores now.
Giveaway So now that we've got a plan in place for your date night nails, you're gonna need some supplies! Forever For a Year is hooking up one (1) lucky reader with the following prize pack:
A copy of Forever For a Year;
$25 Sephora gift card;
nail polish and compact mirror.
To enter, just comment on this post describing your dream date night activity!
Here are the rules:
One entry per person.
Giveaway open to US addresses only.
Must comment with a valid email address to be reached for your prize.
Must be 18 years or older (or have parent's permission) to enter.
Entries close Friday, July 31st, 2015 at 11:59pm MST.
Chosen winner will have 48 hours to reply to the notifying email, after which a new winner will be chosen.
I remember when I was a kid, one of my favorite times of the year was when we released ladybugs into the garden during Sunday School. They had boxes of ladybugs for us, and we got to set them free into the garden to help manage the pests. They'd crawl all over us, and we'd run around looking for where they'd landed in the dirt. Their bright red backs always stood out against the dark soil.
I think that butter LONDON has nailed that bright, vibrant red-orange ladybug color for this lacquer, fittingly named Ladybird. I applied two coats for the base - the formula is smooth and even. It has that sort of squishy feel to it, without showing any nail line.
Then, I added some black spots in various sizes to take the ladybug look even further! Try using a pencil eraser to "stamp" on the largest spots, and a dual ended dotting tool for the other sizes.
Have you guys checked out the China Glaze Desert Escape collection yet? I really dig the color makeup of it. There's something for everyone, you know? You've got a neutral, a metallic, a squishy red, a girly pink, a funky turquoise, and a silky magenta.
I reached for four of the six shades from the collection to put together this easy nail art. I think it's kind of charmingly vintage, yeah? Like, maybe you'd see it in your grandma's bathroom, and she's had it like that since the 1960s.
And gueI think just about anyone could pull this off. All you need to be able to do are vertical stripes (the easiest of all the stripes) and dots!
The shades I used are: China Glaze What's She Dune? (nude) China Glaze Don't Mesa With My Heart (pink) China Glaze The Heat Is On (red) China Glaze Meet Me In the Mirage (rose gold)
Begin by applying a base of the nude.
Use a nail art brush to paint on a wide stripe of rose gold down the middle of your nail.
Stack a medium red stripe on top of the rose gold stripe.
Stack a thin pink stripe down the middle of the red stripe, then add two sets of two thin pink stripes at the edges of each nail.
Add red and pink dots in pairs of two in the open spaces.
Unlike China Glaze collections you may be used to, the Desert Escape collection is only available on LockandMane.com. Each shade retails for $7.50. Have you picked up any? Do you have plans to?